advanced, beginner, education, instructional, photography

FREE TUTORIAL: FOCUS STACKING

One of my goals (just like everyone else) during this time of quarantine is to finish a few long put-off projects. And I must say that I am pretty happy with some of the things I’ve been able to accomplish when I’m forced to be indoors most of the time.
Once such project has been to create new tutorials for all of you interested out there. I’m pleased to say that I just finished a new one, and I’m offering it for FREE!
It’s a 15 minute video on Focus Stacking. the new technique to achieve hyper-focus. Check it out by clicking the screenshot below.
I have a few more in the works, some free, and some will be for purchase. Check out what’s available and what’s up next HERE. I hope they are helpful! Let me know if there’s anything specific you’d like to see.
— Andrew

SPECIAL OFFER for my blog followers – 10% off everything by using code “BLOG10” at checkout
VIDEO TUTORIALS
Check out my free and paid video tutorials and learn from a 20+ year professional.
NEW WORKSHOPS

Learn photography and enjoy a guided travel adventure.
INTO THE WINDS // BACKPACKING + PHOTOGRAPHY ADVENTURE
BIG CYPRESS // OFF-THE-BEATEN PATH // LANDSCAPES + WILDLIFE
TELLURIDE // FALL COLOR // LUXE LANDSCAPES
GIFT CARDS
Give the gift of beauty, travel, and knowledge… buy a gift card. Help a small business.
The Photographic Guide to Our National Parks” series of eBooks:
Rocky Mountain National Park
Grand Teton National Park
PRINTS
Andrew Slaton // Limited Edition Prints
Andrew Slaton // Canvas + Metal Prints
STOCK
Tandem Stills + Motion // Andrew Slaton
ASSIGNMENTS
andrew@andrewslatonphoto.com
Thanks for visiting AndrewSlatonBlog.com
All images and content © ARS Media, LLC 2020
Standard
advanced, education, photography

SCOUTING IN THE EVERGLADES

By failing to prepare, you are preparing to fail.” ~ Benjamin Franklin

An often overlooked aspect of photography is the time and energy needed to focus on pre-production.

Pre-production is a term we use in commercial photography. It’s the time leading up to the actual day of the shoot that we spend in preparation to iron out all of the details, so that the shoot can run smoothly. It really is no different with travel and landscape/ nature photography… Perhaps just a little less involved and stressful.

So, for the initiated and uninitiated alike, I have several tips. The first and foremost is the importance of scouting.

From “boots on the ground” experience in years past, I knew this shot was possible, so this year I waited for the prime conditions and was rewarded.

Scouting involves time spent researching locations; utilizing the web, books, social media, and “boots on the ground.” So where to start? Well, let’s take an example location and walk through my process. How about the Everglades, since I’m currently looking at this amazing place outside my window!

Preparation, I have often said, is rightly two-thirds of any venture.” ~ Amelia Earhart

Knowing from research that this was an area in which I could get close access to american alligators from a low angle, I was placed in the right scenario to catch a dragonfly resting on this gators head.

When I first visited Everglades National Park as a naive college student back in 2000, I did almost no research. As a consequence, I had an amazing adventure, but came away with very few decent images (and really those few were only by chance). Any photographers worth their salt will tell you that scouting is one of the most important ways to improve consistency in outcome. Really, this principal applies to everything. Preparation is one of the most important keys to success in any endeavor.

Learning from research that dragonflies are plentiful in this part of south Florida, I envisioned this shot months before it materialized right in front of me.

There are several effective ways to scout. Some more effective than others. Here, I’ll run through my list of methods…

First, know how to read maps. More specifically, topographic maps. This seems to be a bit of a lost art these days. With GPS and Siri, many younger folks have lost the ability. Reading contours, elevation changes, and even directions are very important if you want to scout before you even reach the location. I always either purchase a physical map, or download the 7.5 min USGS topos for free to my phone via the Avenza Maps app before beginning the scouting process. Properly reading a top map will help you identify potential areas of interest before reaching a location. If you do not feel comfortable reading a map, I recommend this great video by REI.

I had an idea to show human/ wildlife relationships in the Everglades ecosystem. After chatting with a friend who had heard from a park ranger that this alligator was hanging around a popular lake for kayakers, I was given my opportunity.

Next, I scour the internet for images of the place to which I’m traveling. Google image search and social media (specifically Instagram) are excellent places to start. Search geo tags of your location to get ideas and to visualize what images you would like to capture on your trip. Now, be advised that this can take a little discernment on your part, as some people incorrectly tag images. However, it should give you a broad sense of what is possible, and it will help you to create your ever important shot list. You will likely find many stunning captures when researching, so make notes of the specific locations that catch your eye. This may take a bit of diving, as some images on the web are a bit more cryptic with the location info, and for good reason. Blogs tend to have a lot of good info, so that may be a likely place to start.

Before anything else, preparation is the key to success.” ~ Alexander Graham Bell

There are only a few places in the U.S. to see the endangered American Crocodile. Proper pre-production led me to this fruitful location to get close enough to nature the reptilian eye.

Many photographers though, myself included, have become a bit more tight lipped about specifics in recent years. This is because of the massive spike in travel, and more specifically, photo-tourism, causing locations that used to be quiet, clean, and cherished by professional photographers to become overrun, trashed, trampled, and disrespected by the masses seeking their “trophy shot.” Rest assured, if you point-blank ask a photographer where a particular image was taken, they will almost certainly ignore the inquiry. After a short stint of widely sharing location info broadly over the web, it appears as though we’re back to the age of investigation to find places. And I’ve come around to think that is a better way.

Checking out (at your local library), or buying books on your location is one of the old, time-tested ways of scouting as well. Purchasing is especially helpful if you want to take them with you and if you plan to visit these locations again and again. However, when I’m researching on the cheap, the public library is invaluable! There are several good guidebooks that are specifically oriented to photographers, like The Photographer’s Guide To The Everglades by M. Timothy O’Keefe, for example. There are several in this series, so unless you are planning to visit a very remote location, chances are you will find a suitable guide to give you some ideas.

Guidebooks and previous in person experience gave me the knowledge that purple gallinules can be observed closely on the anhinga trail. I wanted an overhead shot to show the incredible feet of this colorful bird.

The Photographer’s Ephemeris and Photopills are both excellent apps that will help you to figure out whether your specific shots will be best at sunrise or sunset. This is an important step in the research process, as it will insure the best use of your time once you arrive.

At this point, you should have enough specifics and general info to create an extensive shot list. I start with specifics, images that are in my head that I want to achieve first and foremost. Then I add more general shots that I’d like to achieve. Since I’m a pro, I’m also thinking through different ways to make money with my time, so I will often list stock shots, creative projects, video clips, etc. Here is an example of what that might look like to give you an idea. I recommend printing this out before leaving for your adventure, that way, if you think of other shots, you can easily manually add them with a pen or pencil. Also, there is still some scouting to be done once you arrive!

Now that your shot list is made, and you have arrived on location, scouting moves into the “boots on the ground” phase.

Success is where preparation and opportunity meet.” ~ Bobby Unser

Great blue herons can be surprisingly skittish. I knew I wanted a detail shot if the feathers which would require a closer shot even with a 400mm lens. I found the right location to make this shot through research.

Believe it or not, it’s a good idea to visit the gift shop (or tourist shops nearby) and scour the postcards/ posters/ prints for more inspiration and clues. This practice is often rewarding, if only for inspiration. But sometimes a location or image idea will present itself when you least expect it.

Now is the time to use your map reading skills and spend the midday hours exploring. Drive, kayak, walk, fly your drone (where legal) to get a first-hand look at these lovely places you’ve been researching from afar. Note the challenges they might pose so you can be prepared when you return for the good light. And don’t forget to take your camera along! I know it sounds dumb, but depending on where you are, some great photo opportunities may present themselves to you even in the midday hours.

I’ve shot this particular location several times, but always at sunrise. This year, I decided to hike in the midday hours around it to see what a sunset shot might yield. I was again rewarded for the scouting effort.

This article should give you a road map to prepare better for your photo excursions, whether you are a newer pro or a hobbyist. I can assure you that Implementing these strategies is guaranteed to increase your rate of success.

Just like with anything, success comes to the prepared!

–Andrew

Give me six hours to chop down a tree and I will spend the first four sharpening the axe.” ~ Abraham Lincoln


N O M A D  Magazine // Issue 1
Order your copy today and receive this 100 page full color travelgasm at your door!
Want to learn photography and enjoy a guided experience? Check out my exciting, NEW workshop dates:
INTO THE WINDS // BACKPACKING + PHOTOGRAPHY ADVENTURE
GRAND TETON // FALL COLOR // LANDSCAPES + WILDLIFE
TELLURIDE // FALL COLOR // LUXE LANDSCAPES
I’m excited to announce The Photographic Guide to Our National Parks” series of eBooks:
Rocky Mountain National Park
Grand Teton National Park
If you are interested in purchasing a “print from the road”, please check my prints for sale, or email me directly for a custom request:
Andrew Slaton // Limited Edition Prints
Andrew Slaton // Canvas + Metal Prints
If you are interested in licensing any of the images/ video from this post, please visit my stock agency:
Tandem Stills + Motion // Andrew Slaton 
For assignment work requests, please email me: andrew@andrewslatonphoto.com
Thanks for visiting AndrewSlatonBlog.com!
All images and content © ARS Media, LLC 2020
 
Standard
advanced, art, equipment review, landscape, nature, photography, travel

canon 24 f/1.4L II // field review

Another lens I’ve coveted from a distance for the last few months is the Canon 24mm f/1.4L II (US $1749).

This super fast wide angle prime lens is supposed to be one of the sharpest that Canon has ever produced.  Great for landscape photography, and certainly low-light situations.

And for this, I’ve been dying to test it in the field with my night landscapes.

So, along with the new 500/4, Canon sent me the new 24/1.4 for my Rocky Mountain National Park trip.

ef24_14iiusm_1_xl

Photo courtesy Canon

_MG_7705F

As you can see, it is quite low profile and inconspicuous.  I could see myself using it quite a bit while traveling and walking foreign cities.

While obviously not as versatile as the 24-70/ 2.8, the ease of use, amazing sharpness, and small design make it really appealing to me.

_MG_0516F

Forest and Creek, Canon 24mm f/1.4L II, Canon 5D MKII, 13 sec. @ f/22, ISO 200, 77mm Canon Circular Polarizer, 77mm Hoya Pro 1 Digital NDx16

_MG_0734F

Forest and Doe, Canon 24mm f/1.4L II, Canon 5D MKII, 1/10 sec. @ f/8, ISO 320, 77mm Canon Circular Polarizer

_MG_0753F

Forest Trail, Canon 17-40mm f/4L, Canon 5D MKII, 1/800 sec. @ f/1.4, ISO 160

_MG_6194F

Fishing The Alluvial Fan, Canon 24mm f/1.4L II, Canon 5D MKII, 1/5 sec. @ f/22, ISO 50, 77mm Canon Circular Polarizer

_MG_6923F

Dream Lake Night, Canon 24mm f/1.4L II, Canon 5D MKII, 15 sec. @ f/1.4, ISO 1000

One of my favorite applications for this lens while in RMNP was capturing the landscape at night.  It’s difficult to achieve a shot like this without a really fast lens, unless you’re wanting a star trail (from the longer exposure time) or a lot of grain and noise (from the super high ISO).  The 24/1.4 was perfect for keeping the grain and noise low while still shooting fast enough to leave the stars in place.  And this was on a night when the moon light was minimal.

_MG_6925F

Dream Lake Star Trail, Canon 24mm f/1.4L II, Canon 5D MKII, 240 sec. @ f/5, ISO 250

I was even impressed with its macro capabilities.  With a closest focusing distance at 3 in., gorgeous wildflower shot are possible.  Though not a true macro lens, I was impressed with its close-up abilities.

_MG_8420F

Alpine Forget-Me-Not, Canon 24mm f/1.4L II, Canon 5D MKII, 1/640 sec. @ f/2, ISO 100

_MG_8449F

Bear Lake, Canon 24mm f/1.4L II, Canon 5D MKII, 1/60sec. @ f/11, ISO 100, 77mm Canon Circular Polarizer

_MG_8540F

The Alluvial Fan, Canon 24mm f/1.4L II, Canon 5D MKII, 1/8000 sec. @ f/1.4, ISO 100, 77mm Canon Circular Polarizer

_MG_8570 1F

Half Moon Over Odessa, Canon 24mm f/1.4L II, Canon 5D MKII, 1/250 sec. @ f/2.8, ISO 250

_MG_8588 1F

Odessa Lake Reflection, Canon 24mm f/1.4L II, Canon 5D MKII, 1/50 sec. @ f/4, ISO 400, 77mm Canon Circular Polarizer

_MG_8729F

Stars Over Odessa, Canon 24mm f/1.4L II, Canon 5D MKII, 0.4 sec. @ f/1.4, ISO 4000

RMNP_PAN_3b

Odessa Lake Night Panoramic, Canon 24mm f/1.4L II, Canon 5D MKII, 0.4 sec. @ f/1.4, ISO 3200

RMNP_PAN_4

Odessa Lake Sunrise Panoramic, Canon 24mm f/1.4L II, Canon 5D MKII, 1/80 sec. @ f/4, ISO 400, 77mm Canon Circular Polarizer, Singh-Ray 4×6″ Galen Rowell 3 stop Soft-Step Neutral Density filter handheld

I have a suspicion that this lens comes in handy most with weddings because of how insanely fast it is.  But because of its sharpness and relative versatility, it’s a great landscape/ nature lens.  My main issue with this tool was focal length.  At 24mm, I found myself backing up and still wanting to see more.  I may have found it more helpful with landscapes if it were a 20/1.4.  However, it’s not.  So, with that said, I found it to be gorgeous, with just a few limitations.

Overall, the Canon 24mm f/1.4L II is sharp, fast, versatile, and well built.  This lens is a great tool in the Canon arsenal!

For more detailed specs, I again relied on the great people at the-digital-picture.com.  They have fantastic reviews and accurate information.

all content © andrew r. slaton | photographer 2013

Standard
advanced, art, equipment review, nature, photography, travel, wildlife

canon 500 f/4L IS II // field review

I have been itching to get my hands on the new Canon EF 500mm f/4L IS II USM(US $10,499).

I’ve shot several times with the version one 500 f/4 and 600 f/4, and loved them, but I must admit, I was excited to feel the improvements in weight, sharpness, and features firsthand.

And what better time to put a super-tele to the test than on a trip to Rocky Mountain National Park!?

So, thankfully, a few days before my road trip, I received a huge 22 lb. box from Canon… woo hoo!!

Below are a few examples of photographs I made on the trip with the new lens.  All technical info is also listed below each photo.

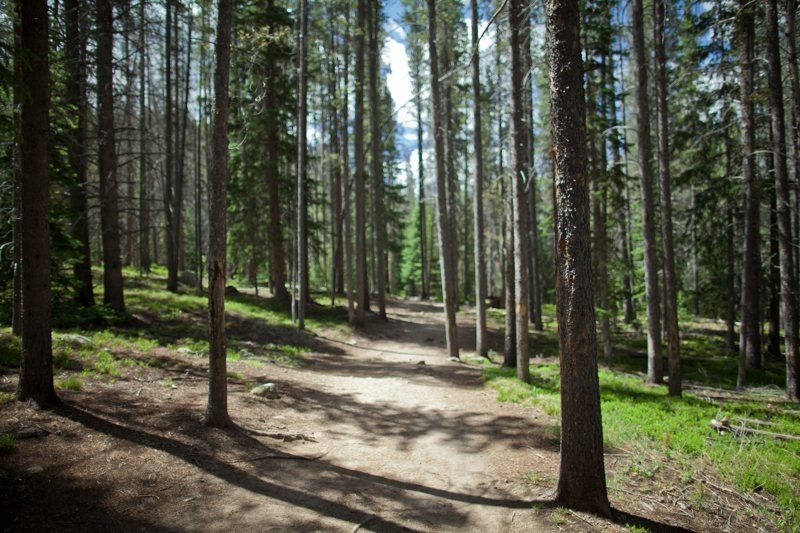
Overall, what I noticed most was the amazing reduction in weight.  I hiked dozens of miles with this lens (along with all my other equipment), and let me tell you… it was leaps and bounds better than hiking with its predecessor.

They were able to shave off over 1.5 lbs thanks to magnesium and titanium construction elements.

canon-ef-500mm-f-4l-is-ii-usm-245-p

Photo courtesy Canon

The difference in weight was so noticeable, in fact, that it wasn’t even too difficult to hand hold.  Though I did prefer using this lens with a monopod :)

_MG_6179F

The sharpness and clarity are better than any other super tele I’ve evaluated so far.  And in my opinion, I would have found it hard to improve on the original version.  But somehow, Canon did.

_MG_8376F

Rocky Mountain Bull Elk, Canon EF 500mm f/4L IS II USM, Canon 5D MKII, 1/160 @ f/8, ISO 100, with Canon Extender EF 2x III

_MG_8488F

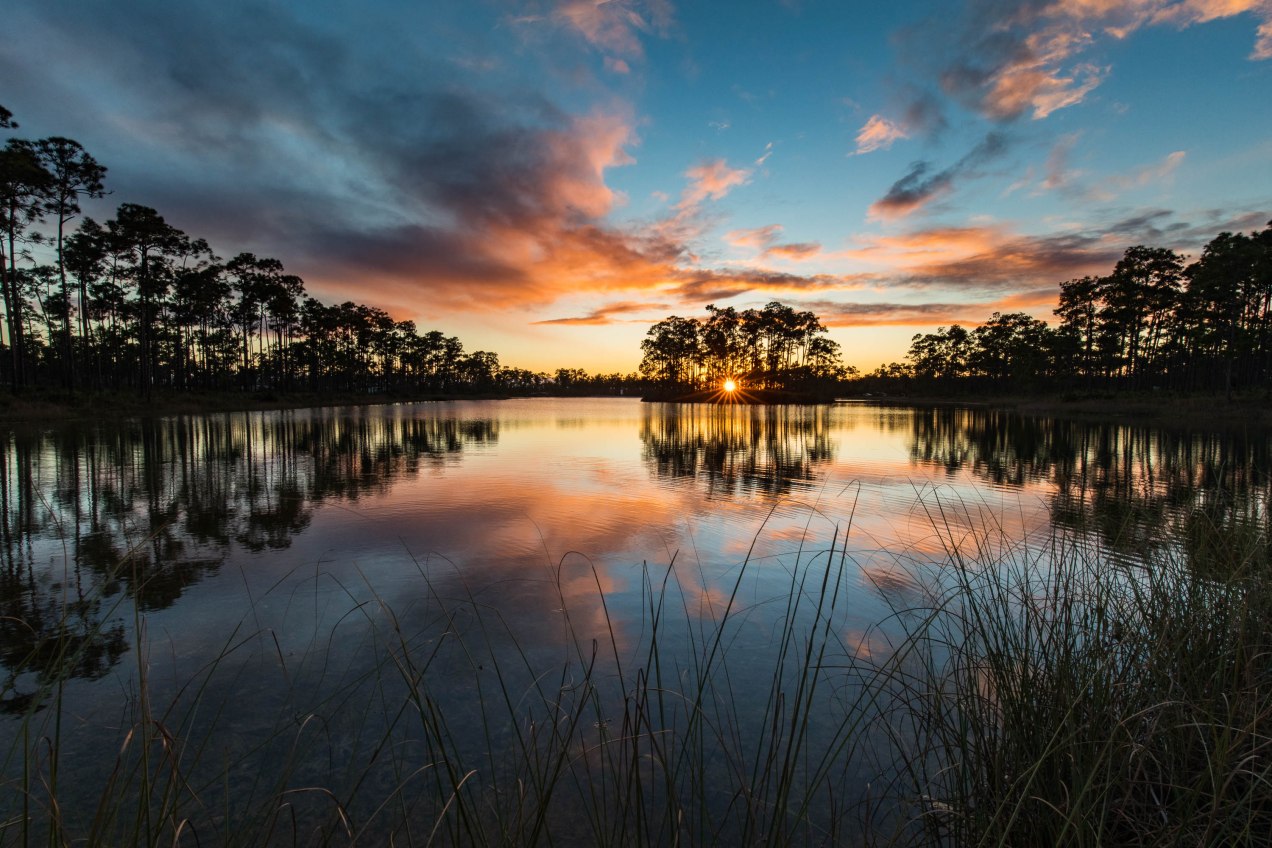
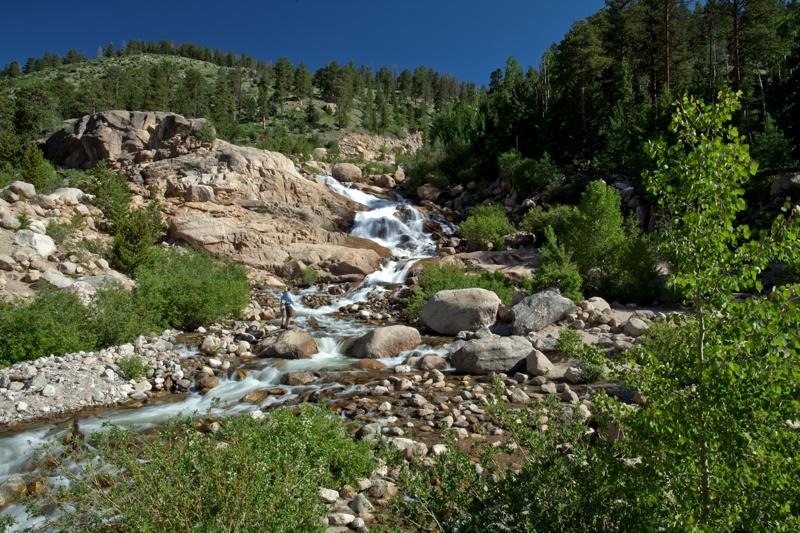
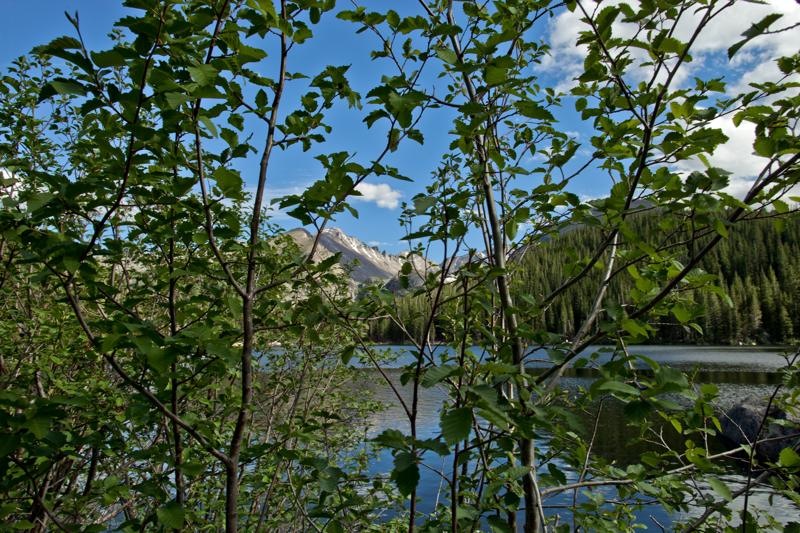
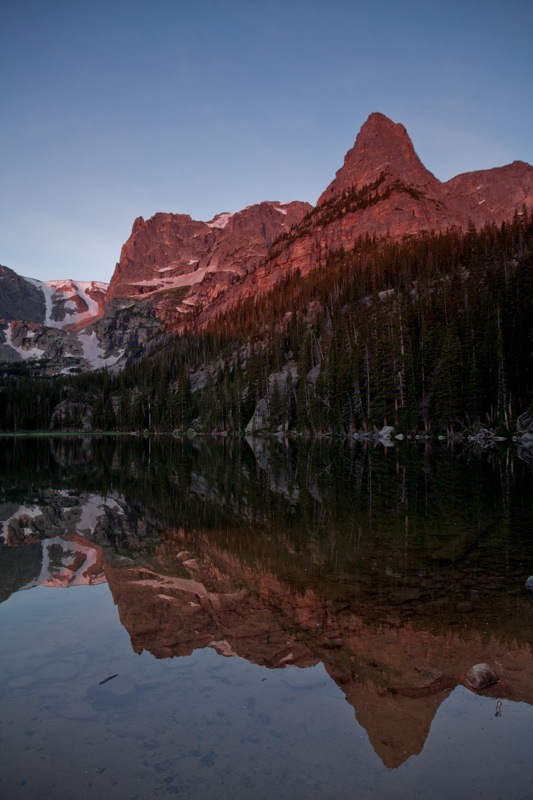
Fly Fishing Dream Lake, Canon EF 500mm f/4L IS II USM, Canon 5D MKII, 1/200 @ f/4, ISO 400

_MG_8568F

unidentified bird (please help if you know!), Canon EF 500mm f/4L IS II USM, Canon 5D MKII, 1/200 @ f/16, ISO 250

_MG_9734F_1

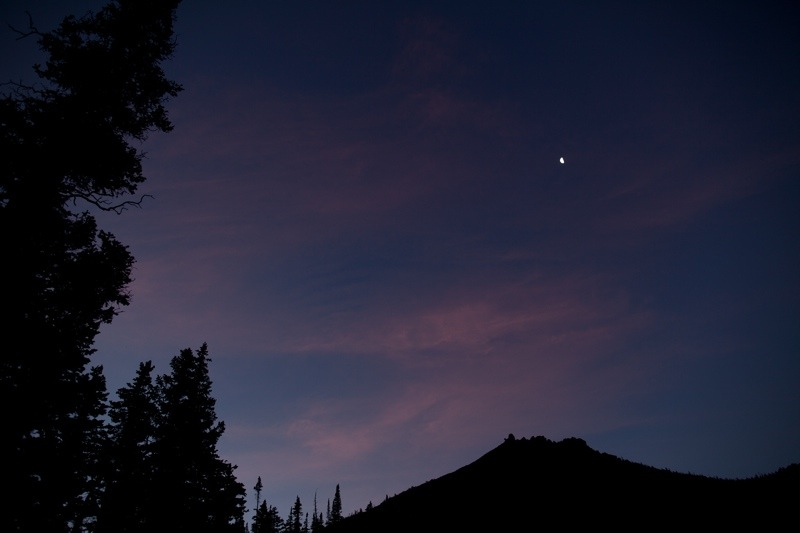
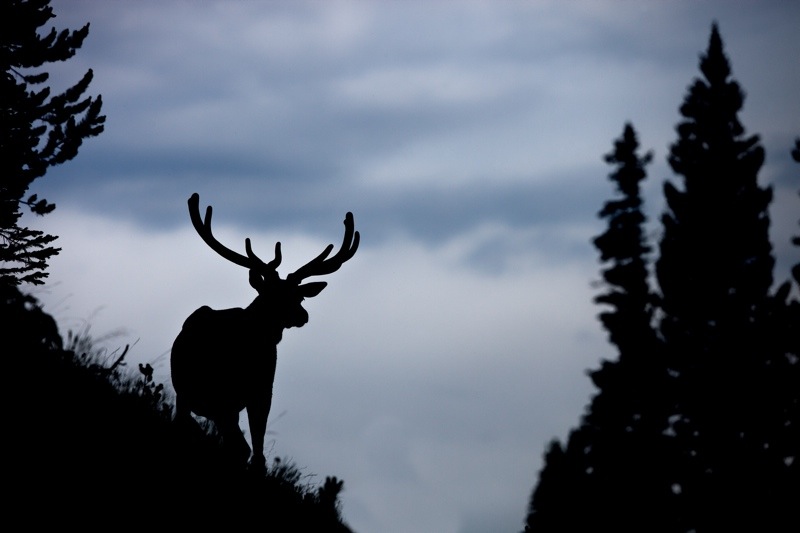
Rocky Mountain Bull Elk Silhouette, Canon EF 500mm f/4L IS II USM, Canon 5D MKII, 1/2000 @ f/6.3, ISO 500

I wasn’t able to play around much with the 3 different IS (Image Stabilization) settings, but I have found an excellent review that will certainly fill in some of the blanks that I’ve missed, from the good folks at the-digital-picture.com.

They also have a very helpful side-by-side review function that I have included, if you like looking at specs… Canon 500 f/4L vs. Canon 500 f/4L II

_MG_8202F

Cow Moose, Canon EF 500mm f/4L IS II USM, Canon 5D MKII, 1/200 @ f/8, ISO 800, with Canon Extender EF 2x III

_MG_8216F

Moose Calf, Canon EF 500mm f/4L IS II USM, Canon 5D MKII, 1/200 @ f/8, ISO 800, with Canon Extender EF 2x III

_MG_8248F

Cow Moose with Calf, Canon EF 500mm f/4L IS II USM, Canon 5D MKII, 1/125 @ f/8, ISO 800, with Canon Extender EF 2x III

_MG_8304F

Sparring Marmots, Canon EF 500mm f/4L IS II USM, Canon 5D MKII, 1/640 @ f/4, ISO 640

_MG_8268F

Rocky Mountain Bull Elk, Canon EF 500mm f/4L IS II USM, Canon 5D MKII, 1/40 @ f/4, ISO 3200

_MG_8578F

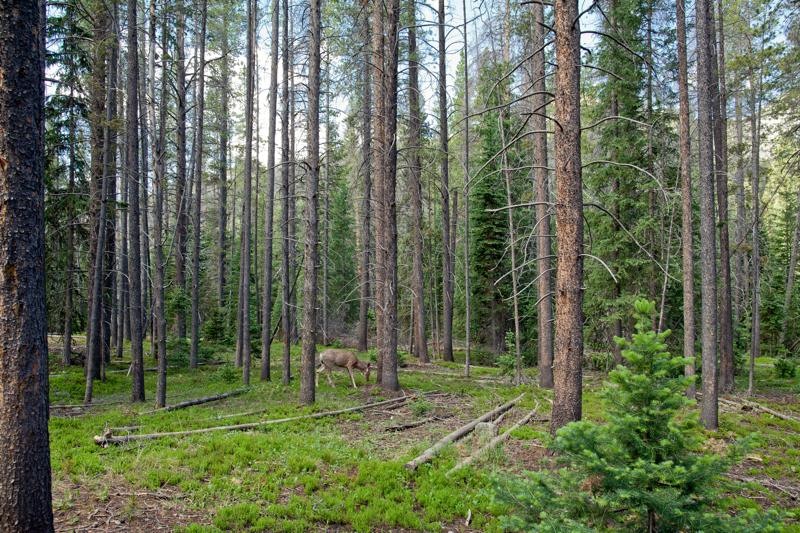
White-Tailed Doe Deer, Canon EF 500mm f/4L IS II USM, Canon 5D MKII, 1/200 @ f/4, ISO 400

_MG_8676F

Mountain Bluebird Pouncing, Canon EF 500mm f/4L IS II USM, Canon 5D MKII, 1/500 @ f/8, ISO 200, with Canon Extender EF 2x III

_MG_8686F

Mountain Bluebird Flight, Canon EF 500mm f/4L IS II USM, Canon 5D MKII, 1/500 @ f/8, ISO 200, with Canon Extender EF 2x III

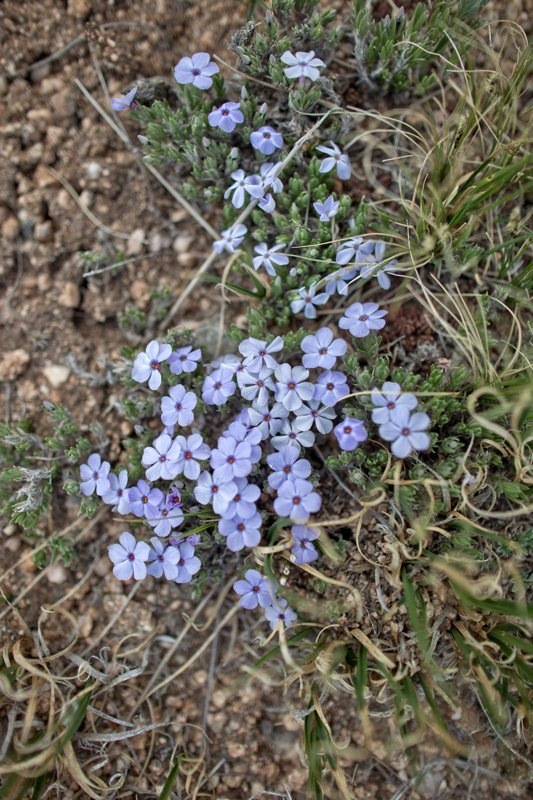
This new version also significantly reduces the minimum focusing distance, thereby making it way less difficult to shoot wildflowers while on the trail.

_MG_9485F_1

Dual Columbines, Canon EF 500mm f/4L IS II USM, Canon 5D MKII, 1/200 @ f/4, ISO 400

_MG_9477F

White Tailed Ptarmigan, Canon EF 500mm f/4L IS II USM, Canon 5D MKII, 1/200 @ f/4, ISO 400

_MG_9518F_1

Bighorn Ram, Canon EF 500mm f/4L IS II USM, Canon 5D MKII, 1/1600 @ f/8, ISO 400, with Canon Extender EF 2x III

_MG_9520F_1

Three Bighorn Rams In A Row, Canon EF 500mm f/4L IS II USM, Canon 5D MKII, 1/400 @ f/8, ISO 400, with Canon Extender EF 2x III

_MG_9576F_1

Cow Moose In A Creek, Canon EF 500mm f/4L IS II USM, Canon 5D MKII, 1/100 @ f/8, ISO 800, with Canon Extender EF 2x III

_MG_9776F

American Robin, Canon EF 500mm f/4L IS II USM, Canon 5D MKII, 1/800 @ f/4, ISO 500

_MG_9792F

Alpine Wildflowers, Canon EF 500mm f/4L IS II USM, Canon 5D MKII, 1/640 @ f/4, ISO 500

I was really happy with the overall construction and performance of this lens.  It held up against foul weather… when hiking, I was rained on several times, and I truly didn’t worry about the moisture affecting this lens.  The image quality is outstanding, even with the Extender EF 2x III.  The weight and size are more manageable than other huge lenses.

And though my biggest complaint (always) with super telephoto lenses is that the AF is slow and difficult, the 500 f/4L II performed far better than any other lens of this magnitude.

There are only 2 real downsides to this lens, and for someone like me, who hikes a lot, the first is its sheer size and (though much lighter) weight.  But considering any alternative of which I’m aware, the 500 f/4L II is the best option.  The second con is the expense.  At just over $10k, it is not an easy purchase to make.  Unless your primary source of income is shooting wildlife or sports, it is not necessary… it’s a luxury.  I will admit, I’m not a lavish living or spending kind of man… but I sincerely want this lens :)

andrew

all content © andrew r. slaton | photographer 2013

Standard
advanced, art, film, film making, landscape, nature, photography, travel, wildlife

rocky mountain np // motion

For fun, I decided to make a short video of some of my time-lapses and motion captures from the trip.

And yes, I just had to sneak some marmots in for a cameo or two….

I hope you enjoy!  For best results, watch in HD.

All motion clips are available for commercial and editorial licensing through Tandem Stills + Motion.

all images and content © andrew r. slaton | photographer 2013

Standard