photography, travel

BACKPACKING + PHOTOGRAPHY

There is no disputing that some of the best, most unique images are created while backpacking. Why is that?

Well, for starters, not nearly as many photographers venture out far enough on foot to capture these rarely seen, pristine wilderness areas. It’s not as simple as pulling up to the next overlook in your comfy vehicle. You have to work for it. You have to carry everything on your back and walk miles upon miles to reach your shot.

So, aside from the obvious hurdle of energy exertion and being in good enough shape, what are the main obstacles to backpacking for photography? Well, simply put… weight. It’s the reason many pro outdoor photographers have made the switch to mirrorless cameras. Saving even ounces can really add up.

I have not yet mades the switch to the lighter, more compact mirrorless cameras. So I’ll be approaching this problem from the old-school perspective. But I believe I have some insight to give that will benefit both the DSLR photographers, and those who have gone mirrorless. The concepts for both are really one in the same. It’s all about saving weight anywhere you can.

First, you must try to accurately assess the location, and its specific gear needs/ requirements. I am including ALL gear here, not just photo related. If you can save ounces/ pounds with your general camping/ backpacking gear, that may mean the difference between taking a particular lens or not. For example, if you are backpacking the Pacific Northwest, you surely need to carry rain gear [waterproof jacket, pants, pack cover, tent fly, and camera cover(s)]. If you happen to be in the desert, leave most of that and simply bring the rain fly for your tent. If, in the off chance, it does rain, you can stash everything in the tent. There are certainly inherent risks in packing this way, but the reward may be that you save your back, and get the amazing shot you wanted. If you are new to backpacking all together, or just need some tips to pair things down, check out the godfather of backpacking, Andrew Skurka’s post on gear. It will prove insightful for both the novice and experienced alike. But keep in mind, he approaches this from a purely backpacking perspective, not photography.

Next, think through the possible shots you’d like to capture. This will take some research/ scouting. See my post on scouting for help if you are new to this concept. Once you have a detailed shot list created, this will help determine which (and how many) camera bodies, lenses, flash, tripod, intervalometer, filters, etc. you will likely need. Only bring what you really need to get the shots.

I have made the mistake so many times on excursions into the backcountry to take extra equipment that I thought I might need. This proved to be a waste of weight and energy exertion. I won’t downplay the difficulty in accurately assessing your pack list, but I also won’t downplay the importance to be as conservative as possible. If in doubt, just don’t bring it. Do more with less.

Make sure you have everything you need to survive, but be willing to sacrifice some comforts to get to a doable weight.

KNOW YOUR LIMITATIONS. I recommend doing some test miles with your pack fully loaded to see if it’s something you can even handle. Hike at least two miles to get a feel for it. The rule is, your pack, fully loaded, should not weight more than 20% of your body weight.

This is much easier said than done. My pack, when on a photo trek is frequently closer to 30% my body weight. I DO NOT recommend this. Stick to as close to (or below) 20% as you possibly can. Your body (specifically knees and back) will thank you as you get older.

It can be intimidating to head out into the wild with everything on your back, especially for the first time. But don’t let that stop you. The rewards far outweigh the struggle. A paraphrased quote from Teddy Roosevelt sums it up best… “Nothing worth doing is easy.”

In a world of the similar photographs from the same places, that everyone posts to social media, we must work a little harder to be distinctive. The unique experiences and photos you can create are everywhere. They are simply waiting for you to find your way to them.

–Andrew

If you are new to backpacking, and would like a helpful first experience, I am excited to offer a fully-immersive, guided backpacking and photography adventure in my favorite mountain range on earth, the Wind River Range in Wyoming. I have not officially announced it yet, but if you are interested, let me know, and I will put you on the “first notified” list. You will learn first-hand from me, as I lead you into the most beautiful wilderness area in the lower 48.


N O M A D  Magazine // Issue 1
Order your copy today and receive this 100 page full color travelgasm at your door!
Want to learn photography and enjoy a guided experience? Check out my exciting, NEW workshop dates:
INTO THE WINDS // BACKPACKING + PHOTOGRAPHY ADVENTURE
GRAND TETON // FALL COLOR // LANDSCAPES + WILDLIFE
TELLURIDE // FALL COLOR // LUXE LANDSCAPES
I’m excited to announce The Photographic Guide to Our National Parks” series of eBooks:
Rocky Mountain National Park
Grand Teton National Park
If you are interested in purchasing a “print from the road”, please check my prints for sale, or email me directly for a custom request:
Andrew Slaton // Limited Edition Prints
Andrew Slaton // Canvas + Metal Prints
If you are interested in licensing any of the images/ video from this post, please visit my stock agency:
Tandem Stills + Motion // Andrew Slaton 
For assignment work requests, please email me: andrew@andrewslatonphoto.com
Thanks for visiting AndrewSlatonBlog.com!
All images and content © ARS Media, LLC 2020
Standard
national parks, photography, travel

PARK PEEK // THE EVERGLADES

The Florida Everglades is not just a National Park, it’s an entire ecosystem stretching from Lake Okeechobee all the way down into Florida Bay and the Keys. It’s an incredible swath of land comprised of both public and private, as well as Native American reservation land.

For photographer and nature lovers, it is a heavenly realm.

I am obviously both, and I will try to share a small picture of what the Everglades experience is like. This land, like any worth preserving, is wild, and not for the faint of heart. It is for explorers and adventurers. It is for the people who bend to nature, not the other way around.

If you approach the Everglades from later perspective, it will break you. And you will have a potentially awful experience. However, if your approach is the former, you will roll with all of the wonderful and terrible surprises she has to offer the outsider. Once you step into this landscape, you are immediately aware that you are, in fact, an outsider.

Its flora and fauna are ancient.

Landscape photographers will find it challenging and frustrating, but also ultimately unique and rewarding. It is where the sky and water unite, and weather creates chances for incredible drama. There are rivers of grass, reflective lakes, pine uplands, cypress bottomlands, brackish canals, and wide open salty bays.

The opportunities for detail and macro images are everywhere.

And the birds… Especially in winter, the amount and variety of birds is astonishing.

The Everglades is also home to the endangered American Crocodile, one of my favorites.

It is also home to one of the most storied wildlife comebacks in history, the American Alligator. Once hunted to near extinction, the species was added to the Endangered Species list in 1967. Now, just over 50 years later, alligators populations are estimated to number over 5 million in the wild. It is, perhaps, the US Endangered Species Act’s most successful project.

Throughout the history of south Florida’s urban development, much of the natural flow of water was impeded. It was not until recently that the importance of this area was truly realized. Today, there are massive efforts underway to restore much of what was damaged.

Thankfully, the beauty and mystery of the Everglades is on full display for visitors. There is much work to be done, but what does remain of this place, is enough to inspire the young and old alike to cherish it.

I love sharing this area so much, and it is so rich with photographic opportunities, that in January/ February/ March of 2021 I plan to have two Everglades and two Big Cypress workshops/ tours. As of now, dates are tentative, and registration is not yet open. However, if you would like more information, please email me to express your interest, and I will add you to the list of first notified.

–Andrew

If you enjoyed this article and found it helpful, consider joining me on the adventure of a lifetime to learn so much more. I offer workshops and tours in many of the worlds most incredible locations, and on these trips, you will get tons of one-on-one time to ask me anything. In fact, I’m offering $250 off my Big Bend Wildflowers + Stars workshop coming up in March, for a limited time. Let me help inspire you to become the artist you’ve always wanted to be! 


Ellen and I hit the road full-time in June of 2016. We are on a mission to inspire and educate everyone on the importance of getting outside. Check out my workshops and my prints. The revenue will help propel us further on this great adventure. Enrich yourself and others… and feel great about it too as you’re helping to ensure our public lands are cherished and to keep the wild spirit of the American Dream alive. Our goal is to visit all 60 National Parks in 3-5 years. We are currently in year 4 and half way thru the Parks. LEARN MORE ABOUT WHAT WE’RE DOING HERE


N O M A D  Magazine // Issue 1
Order your copy today and receive this 100 page full color travelgasm at your door!
Want to learn photography and enjoy a guided experience? Check out my exciting, NEW workshop dates:
INTO THE WINDS // BACKPACKING + PHOTOGRAPHY ADVENTURE
GRAND TETON // FALL COLOR // LANDSCAPES + WILDLIFE
TELLURIDE // FALL COLOR // LUXE LANDSCAPES
I’m excited to announce The Photographic Guide to Our National Parks” series of eBooks:
Rocky Mountain National Park
Grand Teton National Park
If you are interested in purchasing a “print from the road”, please check my prints for sale, or email me directly for a custom request:
Andrew Slaton // Limited Edition Prints
Andrew Slaton // Canvas + Metal Prints
If you are interested in licensing any of the images/ video from this post, please visit my stock agency:
Tandem Stills + Motion // Andrew Slaton 
For assignment work requests, please email me: andrew@andrewslatonphoto.com
Thanks for visiting AndrewSlatonBlog.com!
All images and content © ARS Media, LLC 2020
Standard
art, composition, photography

GOING ABSTRACT

Since I began making pictures on film in the mid-nineteen nineties, I have been fascinated with abstract imagery. Back then, mostly it was by accident… an errant frame here and there, missed focus, motion blur, etc.

In the days of film, you truly never knew how your film was going to turn out. Light leaks, camera malfunctions, lab errors… these were all distinct, albeit not common, potentialities.

Now, I make a point to blur an image with motion, or purposefully shift out of focus, for effect and to convey emotion. It’s simply another useful tool by which to create something. Even a feeling.

Whether intentional or not, abstract photography can be powerful.

The world is full of incredible shapes, textures, and colors. As a photographer, you can remove the context of an image to allow the viewer to see something completely new.

If you are interested in trying out this way of seeing and shooting, here are some helpful ways to start.

Look for textures, patterns, lines, and shapes

In the world of nature, there are textures, patterns, lines, and shapes everywhere if you train your eyes to see them. For me, it takes an intentional action to begin walking slower and looking for these details. But once you dial in to that frequency, you may find it hard to stop!

Shoot macro

Seeing minute details will allow you to create lovely abstractions. And you really don’t have to have a specific macro lens, though it can be helpful. The main point is to get down into the minutia. Get close with whatever lens you can. Leave all the distractions out of your frame and simplify what the viewer sees.

Use motion and manual focus to blur your subject

This technique is the most difficult to achieve at a high level, and it’s also my favorite! Use a slower shutter speed and experiment with purposefully moving your camera. Try up and down, left to right, swirling, etc. See what works and what doesn’t. Create new shapes and blended colors with what’s before you.

Aside from motion blur, set your lens to manual focus and start playing. It often works really well to shoot into the light when trying this technique. It will create shapes, and accentuate color, as I’ll mention in the next section.

Experiment with light

Backlight is my absolute favorite. And in combination with one of the other techniques, like motion blur or blurred focus, backlight can really come alive. As mentioned above, it will accentuate color and shapes, in this case lines.

Aerial details

With the advent and availability of drone photography, it has opened a whole new realm to the casual photographer to be able to experience perspectives only seen before by those with access to aircraft. Aerial abstraction is powerful when the light is right and the subject compelling. I’ve only recently bought a drone, so I have a way to go, but I’m loving learning and experimenting!

Again, shooting abstracts is a way to expand the way we see and convey feeling to our viewer. It is simply another tool in the toolbox of visual art and photography. Exercise this muscle by practicing the way you see, and I’m sure you will find it quite fulfilling and enjoyable.

–Andrew


N O M A D  Magazine // Issue 1
Order your copy today and receive this 100 page full color travelgasm at your door!
Want to learn photography and enjoy a guided experience? Check out my exciting, NEW workshop dates:
INTO THE WINDS // BACKPACKING + PHOTOGRAPHY ADVENTURE
GRAND TETON // FALL COLOR // LANDSCAPES + WILDLIFE
TELLURIDE // FALL COLOR // LUXE LANDSCAPES
I’m excited to announce The Photographic Guide to Our National Parks” series of eBooks:
Rocky Mountain National Park
Grand Teton National Park
If you are interested in purchasing a “print from the road”, please check my prints for sale, or email me directly for a custom request:
Andrew Slaton // Limited Edition Prints
Andrew Slaton // Canvas + Metal Prints
If you are interested in licensing any of the images/ video from this post, please visit my stock agency:
Tandem Stills + Motion // Andrew Slaton 
For assignment work requests, please email me: andrew@andrewslatonphoto.com
Thanks for visiting AndrewSlatonBlog.com!
All images and content © ARS Media, LLC 2020
 
Standard
nature, travel, wildlife

THE MOST DIFFICULT HIKE IN THE U.S.

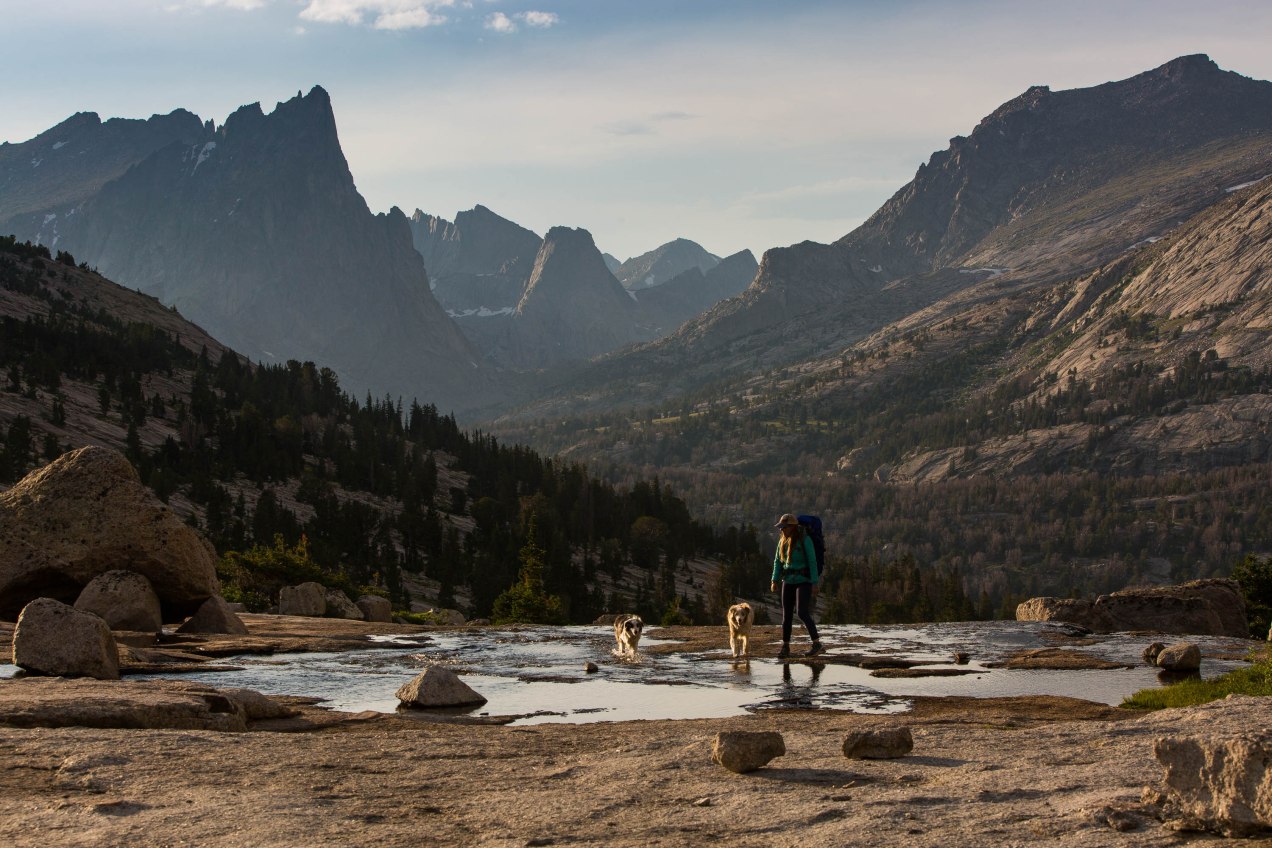
Most people don’t think of Florida when they think of amazing hikes. The sunshine state is also, perhaps, not what hikers think of when they think of difficult hikes. True, Florida is mostly at sea level, so there’s not a ton of elevation gain and loss, and the air is quite thick and rich with oxygen. And true, it boasts temperate weather most of the year. But let me assure you, I completed the most difficult hike of my life, right here in Florida a few weeks ago.

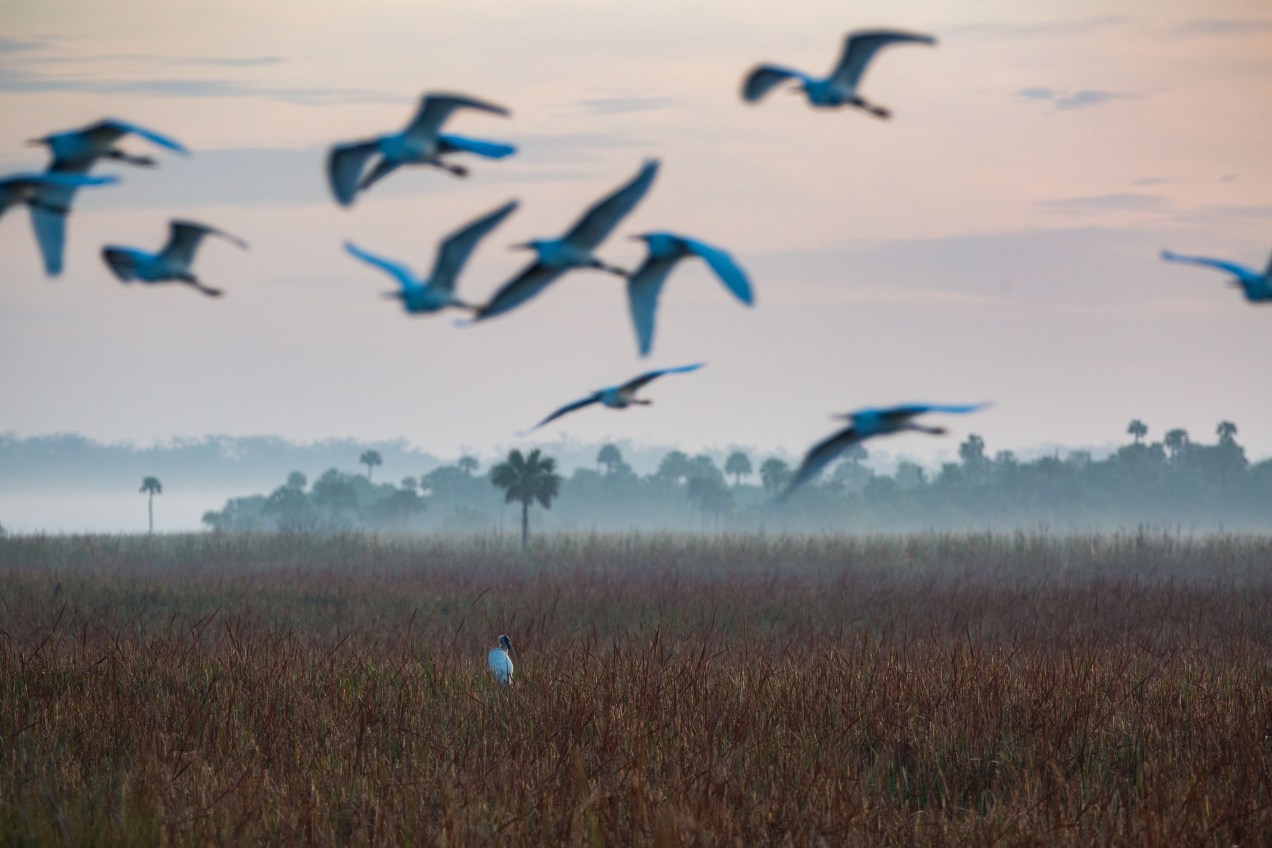
Birds, and other fauna abound in the Big Cypress, a massive part of the Everglades ecosystem.

Ellen and I try to winter in Florida every year, like every other 65+ person in the U.S, because of course, we both appreciate the weather. She loves the Gulf beaches, and I love the abundance of critters, and challenging landscapes to photograph.

This year, I decided to make it a goal to section hike the Florida National Scenic Trail (FNST or simply FT), a 1300 mile span of the entire state. I wanted to explore this diverse and beautiful state, and to get my hiking and wilderness fix, in spite of the season. I figured to do it quite passively, with no real end date in sight. We only spend a few months every few winters here, so I wanted to approach the task realistically. I wish I had read this article by Outside first, but alas, I only found it after while researching some info for this post.

If your hiking NOBO (northbound) on the Florida Trail, you start at the southern terminus, at the Oasis Visitor Center in Big Cypress National Preserve. This is known as the most remote, most dangerous 31 mile section of the entire 1300 miles. Great way to “get your feet wet.” I would come to find that expression translates literally in this case.

It is recommended to take three days to do this section, so of course I decided to make it an overnighter. The first day I planned to do 17 miles from the start at US 41, and the second day, 14 miles, with Ellen picking me up at the end of my section, I-75 (Alligator Alley), at 5PM.

February is considered the “dry season,” however, I only found about 3-4 miles out of the 31 to be actual dry land. The rest of the hike, I was in 6-18 inches of water and muck.

The Big Cypress section of the FT is known as one of, if not the hardest hike in the U.S.

This is prime alligator and snake country. And with temps reaching 87 degrees during the day, it is not uncommon to come across reptiles in Big Cypress, even in February. Many dangerous and some venomous.

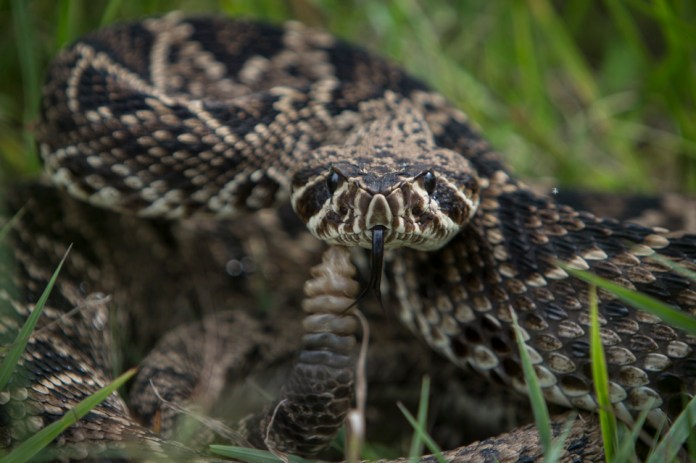
Eastern diamondback rattlesnakes are just one of the venomous snakes commonly found throughout Big Cypress.

Thankfully, I only came in close contact with a water moccasin once. But the opportunities abound.

The orange blazes marked on the cypress and pines help to keep the hiker on trail, when the trail is not always so visible.

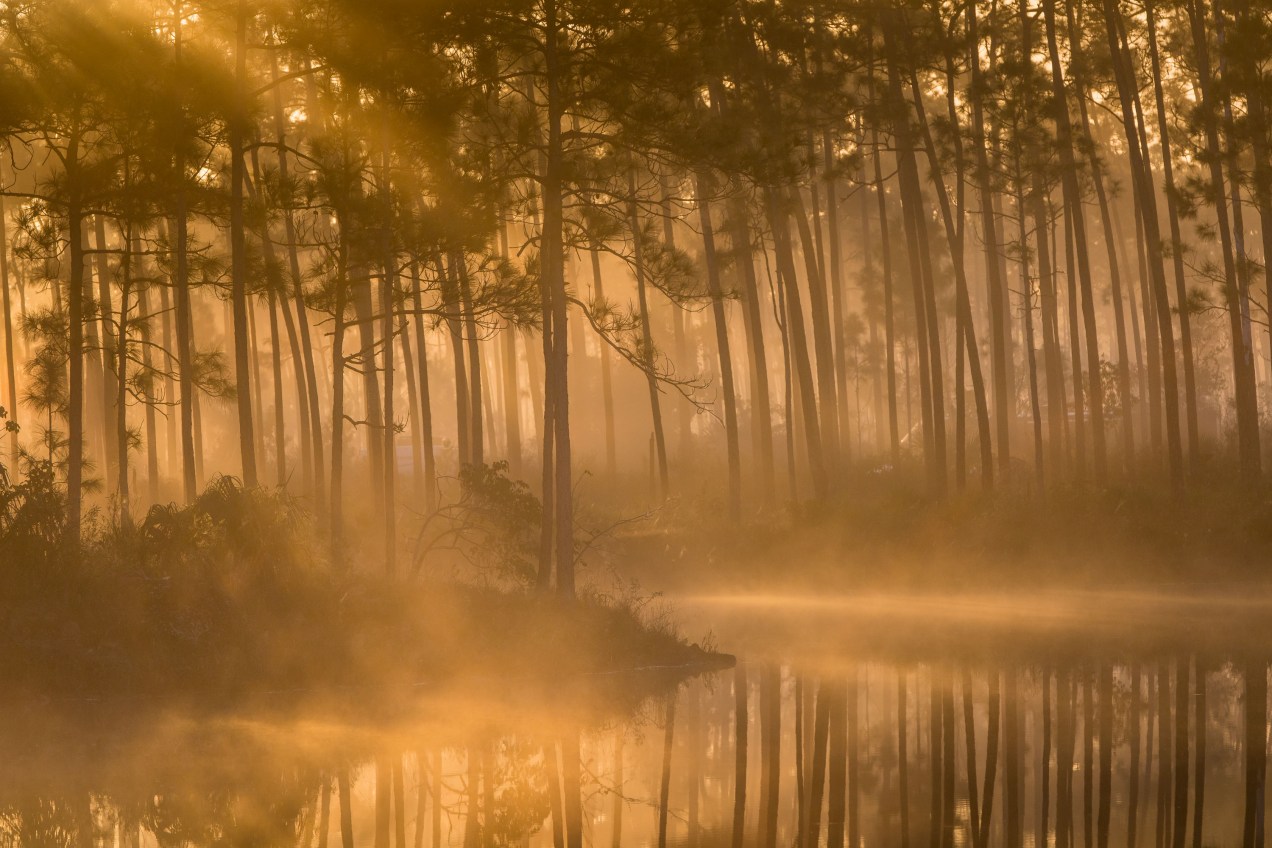
It is a truly haunting and beautiful landscape though. Vast cypress strands with bromeliads create hanging gardens to slosh beneath. Your eyes are constantly tilting down, watching the murky waters for danger, then glaring up to make sure you still see the orange blazes, on many stretches, the only indicators of your trail. To top it off, there is almost no shade on the entire hike.

Only a few miles in this realization hits… your exposure to the blazing sun is profound and inescapable. Even in winter.

The cypress swamps are beautiful gardens teeming with amazing plants and animals.

Lovely wildflowers dot the swampy landscape, even in winter.

After deciding to stop several times the first day well short of my 17 mile goal, I came across two guys hiking SOBO (southbound). They told me that if I could make it the 3-4 more miles to 13 Mile Camp (confusing, because if hiking NOBO, it’s actually 17 miles in) I would find dry land on which to comfortably camp and a large trail maintenance group that was giving out water.

I had underestimated how much water to bring, so this info came to me as the best motivator possible. Of course I brought my filter, but I can assure you I only wanted to drink the water I was sloshing though as a last resort. So I pushed on.

I reached 13 Mile Camp with a few hours of sunlight to spare. I started my hike a bit late that day at 10AM, and reached the 17 mile mark at 4:30PM. I won’t lie, I was completely exhausted. My feet were sore from the constant post-holing up and down through deep mud. My shoes never got dry on the entire hike.

But I made it.

It is not at all uncommon to stumble upon alligators on this section of the Florida Trail.

The trail crew could not have been nicer. They were camped only a quarter of a mile or so away. They gave me as much water as I wanted, and so I alleviated the symptoms of dehydration I was already showing. I stumbled back to my lonely camp and crashed. The anxiety for tomorrow, and the warnings for what lie ahead from the trail crew swirled in my thoughts. I had told them I made it this far in one day and that I planned to do the rest of this section tomorrow, and I saw the looks they gave one another. Their lack of confidence in me was palatable.

Trekking poles are a must if backpacking the Big Cypress section.

When I got reception for a moment the next morning, I called Ellen to tell her to plan on not picking me up today… I would need another night out and a half day to complete this section. I felt a bit defeated.

I’m comfortable tackling 15-20 miles at high elevations, carrying 50 lbs on my back. Here, I was at sea level, carrying only 35-40 lbs. How was it that Florida was kicking my butt already?

Yet, I pressed on. One step at a time.

That’s the “mantra” I use when a hike seems too difficult for me… “one step at a time, Andrew. Just one. Step. At. A. Time.” It’s become a lovely metaphor for life for me. When trials come, disaster hits, despair takes hold… “one step at a time, Andrew. Just one. Step. At. A. Time.”

I know it’s cliche, but hiking/ backpacking really is an uncanny metaphor for life. You have your mountaintops and moments where you are overwhelmed by all of the beauty, and then the long, seemingly never-ending uphill slog, when you feel like you can’t take it anymore. And all you have to do is put one proverbial foot in front of the other. And then again. And again. Until, eventually, you reach the mountaintop again, and take your rest.

The birds of Big Cypress are plentiful and fascinating.

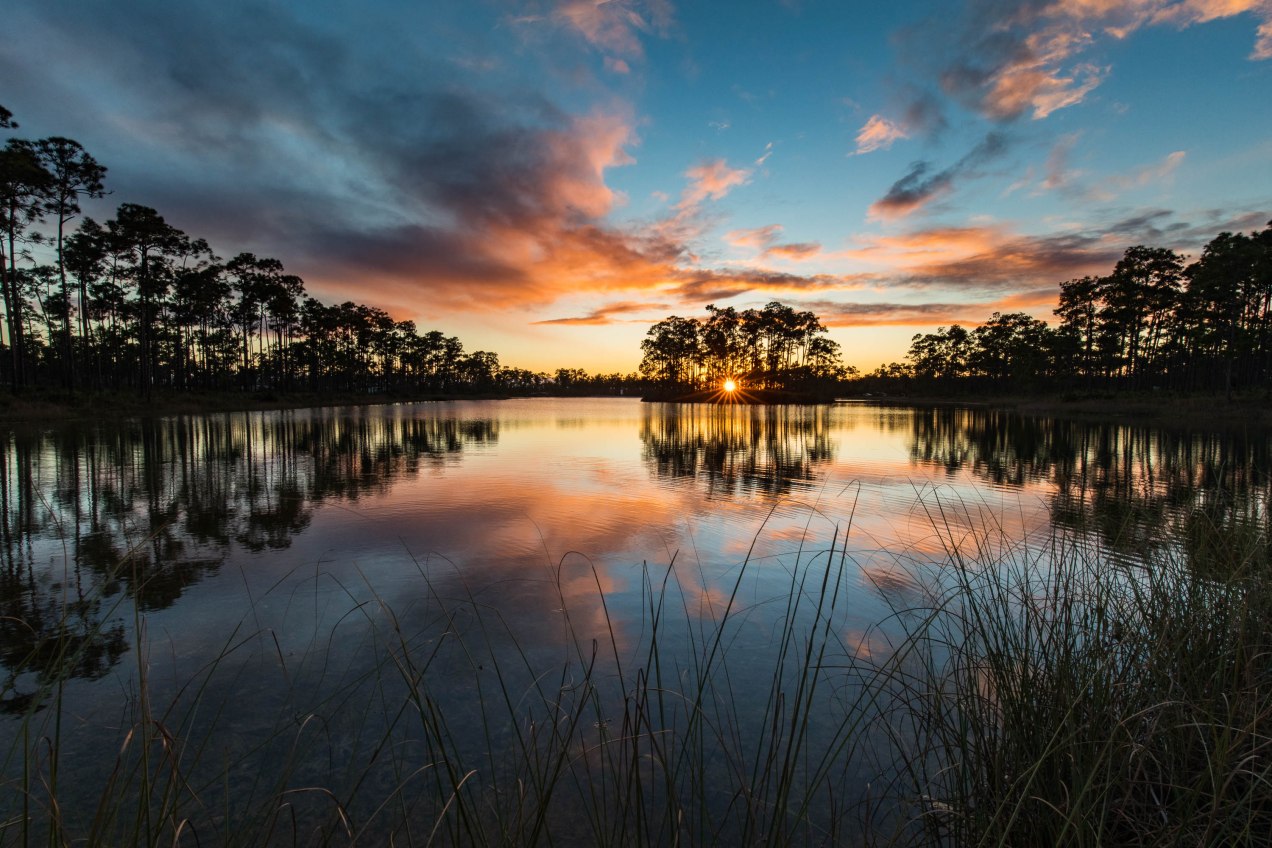
Sunrise and sunset in Big Cypress are worth all of the pain and misery.

Birds (and water) are the only constant companions on this lonely section of trail.

Day two was a test of will. It was definitely more challenging than day one. The submerged swamp sections grew longer and more maze-like, the water deeper, the mud more viscus. I nearly fell several times, which could have been incredibly defeating. If you are considering hiking this section, and I do realize that’s unlikely after reading this post, may I suggest trekking poles. I would even venture to say that this hike wouldn’t be possible without them.

Even through several miles of being slowed to one mile per hour, I was actually making good time. I couldn’t believe it. My “one step at a time” mantra was working.

I got reception and hurried to call Ellen. I was already going to run out of water again if I stayed another night, and I was beginning to see the possibility of finishing as planned on day two. My will to finish was kicking in. The mosquitos, wet feet, and difficult steps were enough at this point to propel me forward to unending fresh water, my bed, and an escape from the bugs.

Starting at 8AM, I was able to make it to the finish line ahead of schedule, at 4:30PM.

I hit the pavement of the I-75 rest area, tossed my pack to the ground and immediately ripped my soaked, muddy shoes and socks off. It was one of the best feelings to know that I accomplished what I set out to do. Ellen pulled up with the pups only a half hour later, with a victory beer in a beachy coozie.

So I’m sure you are asking yourself “why?” Rightfully so. Ellen asked me several times before and after. And I think the best answer I could  muster was that sometimes the hard things, the things that haunt our dreams and cause us to worry… the things that we fear, the unknown… these are the things we must confront. For confidence in ourselves and our abilities, but also to force ourselves to rely on God for strength and protection. Tasks that just seem too tall for us to take on, are the best places for us to dig deep within ourselves to find strength we didn’t know we even had. And more than this, to look outside ourselves for help when we realize we don’t actually have the strength to go on.

The current level of comfort in our age betrays us.

When I get the “why” question, I often think of JFK’s speech about going to the moon. And I find it apropos as people look at me like I’m crazy when I place myself in challenging and difficult, and sometimes even dangerous situations.

How else can you measure a man, if not to put him to the test?

We choose to go to the Moon in this decade and do the other things, not because they are easy, but because they are hard; because that goal will serve to organize and measure the best of our energies and skills, because that challenge is one that we are willing to accept, one we are unwilling to postpone, and one we intend to win, and the others, too.” ~ JFK, 1962

When asked immediately after finishing by a tourist pulling up, “how was it?” I told him I wouldn’t recommend it.

But now, several days later, I actually might consider doing it again. And I actually would recommend it… only to the resilient… with eyes wide open.

–Andrew


N O M A D  Magazine // Issue 1
Order your copy today and receive this 100 page full color travelgasm at your door!
Want to learn photography and enjoy a guided experience? Check out my exciting, NEW workshop dates:
INTO THE WINDS // BACKPACKING + PHOTOGRAPHY ADVENTURE
GRAND TETON // FALL COLOR // LANDSCAPES + WILDLIFE
TELLURIDE // FALL COLOR // LUXE LANDSCAPES
I’m excited to announce The Photographic Guide to Our National Parks” series of eBooks:
Rocky Mountain National Park
Grand Teton National Park
If you are interested in purchasing a “print from the road”, please check my prints for sale, or email me directly for a custom request:
Andrew Slaton // Limited Edition Prints
Andrew Slaton // Canvas + Metal Prints
If you are interested in licensing any of the images/ video from this post, please visit my stock agency:
Tandem Stills + Motion // Andrew Slaton 
For assignment work requests, please email me: andrew@andrewslatonphoto.com
Thanks for visiting AndrewSlatonBlog.com!
All images and content © ARS Media, LLC 2020
 
Standard
advanced, education, photography

SCOUTING IN THE EVERGLADES

By failing to prepare, you are preparing to fail.” ~ Benjamin Franklin

An often overlooked aspect of photography is the time and energy needed to focus on pre-production.

Pre-production is a term we use in commercial photography. It’s the time leading up to the actual day of the shoot that we spend in preparation to iron out all of the details, so that the shoot can run smoothly. It really is no different with travel and landscape/ nature photography… Perhaps just a little less involved and stressful.

So, for the initiated and uninitiated alike, I have several tips. The first and foremost is the importance of scouting.

From “boots on the ground” experience in years past, I knew this shot was possible, so this year I waited for the prime conditions and was rewarded.

Scouting involves time spent researching locations; utilizing the web, books, social media, and “boots on the ground.” So where to start? Well, let’s take an example location and walk through my process. How about the Everglades, since I’m currently looking at this amazing place outside my window!

Preparation, I have often said, is rightly two-thirds of any venture.” ~ Amelia Earhart

Knowing from research that this was an area in which I could get close access to american alligators from a low angle, I was placed in the right scenario to catch a dragonfly resting on this gators head.

When I first visited Everglades National Park as a naive college student back in 2000, I did almost no research. As a consequence, I had an amazing adventure, but came away with very few decent images (and really those few were only by chance). Any photographers worth their salt will tell you that scouting is one of the most important ways to improve consistency in outcome. Really, this principal applies to everything. Preparation is one of the most important keys to success in any endeavor.

Learning from research that dragonflies are plentiful in this part of south Florida, I envisioned this shot months before it materialized right in front of me.

There are several effective ways to scout. Some more effective than others. Here, I’ll run through my list of methods…

First, know how to read maps. More specifically, topographic maps. This seems to be a bit of a lost art these days. With GPS and Siri, many younger folks have lost the ability. Reading contours, elevation changes, and even directions are very important if you want to scout before you even reach the location. I always either purchase a physical map, or download the 7.5 min USGS topos for free to my phone via the Avenza Maps app before beginning the scouting process. Properly reading a top map will help you identify potential areas of interest before reaching a location. If you do not feel comfortable reading a map, I recommend this great video by REI.

I had an idea to show human/ wildlife relationships in the Everglades ecosystem. After chatting with a friend who had heard from a park ranger that this alligator was hanging around a popular lake for kayakers, I was given my opportunity.

Next, I scour the internet for images of the place to which I’m traveling. Google image search and social media (specifically Instagram) are excellent places to start. Search geo tags of your location to get ideas and to visualize what images you would like to capture on your trip. Now, be advised that this can take a little discernment on your part, as some people incorrectly tag images. However, it should give you a broad sense of what is possible, and it will help you to create your ever important shot list. You will likely find many stunning captures when researching, so make notes of the specific locations that catch your eye. This may take a bit of diving, as some images on the web are a bit more cryptic with the location info, and for good reason. Blogs tend to have a lot of good info, so that may be a likely place to start.

Before anything else, preparation is the key to success.” ~ Alexander Graham Bell

There are only a few places in the U.S. to see the endangered American Crocodile. Proper pre-production led me to this fruitful location to get close enough to nature the reptilian eye.

Many photographers though, myself included, have become a bit more tight lipped about specifics in recent years. This is because of the massive spike in travel, and more specifically, photo-tourism, causing locations that used to be quiet, clean, and cherished by professional photographers to become overrun, trashed, trampled, and disrespected by the masses seeking their “trophy shot.” Rest assured, if you point-blank ask a photographer where a particular image was taken, they will almost certainly ignore the inquiry. After a short stint of widely sharing location info broadly over the web, it appears as though we’re back to the age of investigation to find places. And I’ve come around to think that is a better way.

Checking out (at your local library), or buying books on your location is one of the old, time-tested ways of scouting as well. Purchasing is especially helpful if you want to take them with you and if you plan to visit these locations again and again. However, when I’m researching on the cheap, the public library is invaluable! There are several good guidebooks that are specifically oriented to photographers, like The Photographer’s Guide To The Everglades by M. Timothy O’Keefe, for example. There are several in this series, so unless you are planning to visit a very remote location, chances are you will find a suitable guide to give you some ideas.

Guidebooks and previous in person experience gave me the knowledge that purple gallinules can be observed closely on the anhinga trail. I wanted an overhead shot to show the incredible feet of this colorful bird.

The Photographer’s Ephemeris and Photopills are both excellent apps that will help you to figure out whether your specific shots will be best at sunrise or sunset. This is an important step in the research process, as it will insure the best use of your time once you arrive.

At this point, you should have enough specifics and general info to create an extensive shot list. I start with specifics, images that are in my head that I want to achieve first and foremost. Then I add more general shots that I’d like to achieve. Since I’m a pro, I’m also thinking through different ways to make money with my time, so I will often list stock shots, creative projects, video clips, etc. Here is an example of what that might look like to give you an idea. I recommend printing this out before leaving for your adventure, that way, if you think of other shots, you can easily manually add them with a pen or pencil. Also, there is still some scouting to be done once you arrive!

Now that your shot list is made, and you have arrived on location, scouting moves into the “boots on the ground” phase.

Success is where preparation and opportunity meet.” ~ Bobby Unser

Great blue herons can be surprisingly skittish. I knew I wanted a detail shot if the feathers which would require a closer shot even with a 400mm lens. I found the right location to make this shot through research.

Believe it or not, it’s a good idea to visit the gift shop (or tourist shops nearby) and scour the postcards/ posters/ prints for more inspiration and clues. This practice is often rewarding, if only for inspiration. But sometimes a location or image idea will present itself when you least expect it.

Now is the time to use your map reading skills and spend the midday hours exploring. Drive, kayak, walk, fly your drone (where legal) to get a first-hand look at these lovely places you’ve been researching from afar. Note the challenges they might pose so you can be prepared when you return for the good light. And don’t forget to take your camera along! I know it sounds dumb, but depending on where you are, some great photo opportunities may present themselves to you even in the midday hours.

I’ve shot this particular location several times, but always at sunrise. This year, I decided to hike in the midday hours around it to see what a sunset shot might yield. I was again rewarded for the scouting effort.

This article should give you a road map to prepare better for your photo excursions, whether you are a newer pro or a hobbyist. I can assure you that Implementing these strategies is guaranteed to increase your rate of success.

Just like with anything, success comes to the prepared!

–Andrew

Give me six hours to chop down a tree and I will spend the first four sharpening the axe.” ~ Abraham Lincoln


N O M A D  Magazine // Issue 1
Order your copy today and receive this 100 page full color travelgasm at your door!
Want to learn photography and enjoy a guided experience? Check out my exciting, NEW workshop dates:
INTO THE WINDS // BACKPACKING + PHOTOGRAPHY ADVENTURE
GRAND TETON // FALL COLOR // LANDSCAPES + WILDLIFE
TELLURIDE // FALL COLOR // LUXE LANDSCAPES
I’m excited to announce The Photographic Guide to Our National Parks” series of eBooks:
Rocky Mountain National Park
Grand Teton National Park
If you are interested in purchasing a “print from the road”, please check my prints for sale, or email me directly for a custom request:
Andrew Slaton // Limited Edition Prints
Andrew Slaton // Canvas + Metal Prints
If you are interested in licensing any of the images/ video from this post, please visit my stock agency:
Tandem Stills + Motion // Andrew Slaton 
For assignment work requests, please email me: andrew@andrewslatonphoto.com
Thanks for visiting AndrewSlatonBlog.com!
All images and content © ARS Media, LLC 2020
 
Standard