advanced, beginner, education, instructional, photography

FREE TUTORIAL: FOCUS STACKING

One of my goals (just like everyone else) during this time of quarantine is to finish a few long put-off projects. And I must say that I am pretty happy with some of the things I’ve been able to accomplish when I’m forced to be indoors most of the time.
Once such project has been to create new tutorials for all of you interested out there. I’m pleased to say that I just finished a new one, and I’m offering it for FREE!
It’s a 15 minute video on Focus Stacking. the new technique to achieve hyper-focus. Check it out by clicking the screenshot below.
I have a few more in the works, some free, and some will be for purchase. Check out what’s available and what’s up next HERE. I hope they are helpful! Let me know if there’s anything specific you’d like to see.
— Andrew

SPECIAL OFFER for my blog followers – 10% off everything by using code “BLOG10” at checkout
VIDEO TUTORIALS
Check out my free and paid video tutorials and learn from a 20+ year professional.
NEW WORKSHOPS

Learn photography and enjoy a guided travel adventure.
INTO THE WINDS // BACKPACKING + PHOTOGRAPHY ADVENTURE
BIG CYPRESS // OFF-THE-BEATEN PATH // LANDSCAPES + WILDLIFE
TELLURIDE // FALL COLOR // LUXE LANDSCAPES
GIFT CARDS
Give the gift of beauty, travel, and knowledge… buy a gift card. Help a small business.
The Photographic Guide to Our National Parks” series of eBooks:
Rocky Mountain National Park
Grand Teton National Park
PRINTS
Andrew Slaton // Limited Edition Prints
Andrew Slaton // Canvas + Metal Prints
STOCK
Tandem Stills + Motion // Andrew Slaton
ASSIGNMENTS
andrew@andrewslatonphoto.com
Thanks for visiting AndrewSlatonBlog.com
All images and content © ARS Media, LLC 2020
Standard
beginner, education, instructional, national parks, photography, travel, workshop

10 Comp Tips For Better Photos

As photographers, there is much that is out of our control; weather, wildlife, seasonal changes, road/ trail conditions, etc.

But one thing that we always have ultimate control over is our compositions. Just like a composer of music has the ability to manage the notes, tones, and rests of his/ her musical compositions, photographers have the responsibility of choosing what to include, what to leave out, and how the viewer will ultimately see and feel the final image.

Here are 10 major composition techniques that, if used properly, will make your photos drastically better, immediately.

1. THE RULE OF THIRDS

Imagine that your image is divided into 9 equal segments by 2 vertical and 2 horizontal lines. The rule of thirds says that you should position the most important elements in your scene along these lines, or at the points where they intersect.

Doing so will add balance and interest to your photo. Some cameras even offer an option to superimpose a rule of thirds grid over the LCD screen, making it even easier to use.

2. BALANCING ELEMENTS

Placing your main subject off-center, as with the rule of thirds, creates a more in- teresting photo, but it can leave a void in the scene which can make it feel empty. You should balance the “weight” of your subject by including another object of lesser importance to fill the space.

3. LEADING LINES

When we look at an image, our eye is naturally drawn along lines. Being thoughtful and intentional about how you place lines in your composition can dramatically affect the way the viewer sees the image. It can pull the viewer into the picture, towards the subject, or on a journey through the scene. There are many different types of leading lines – straight, diagonal, curvy, zigzag, radial etc – and each can be used to enhance our photo’s composition.

4. SYMETRY + PATTERNS

We are surrounded by symmetry and patterns, both natural and man-made. They can make for very eye-catching compositions, particularly in situations where they are not expected. Another great way to use them is to break the sym- metry or pattern in some way, introducing tension and a focal point to the scene.

5. VIEWPOINT/ PERSPECTIVE

Before photographing your subject, take time to think about from where you will shoot. Our viewpoint has a massive impact on the composition of our photo, and as a result it can greatly affect the message that the shot conveys. Rather than just shooting from eye level, consider photographing from high above, down at ground level, from the side, from the back, from a long way away, from very close up, and so on.

6. BACKGROUND

How many times have you taken what you thought would be a great shot, only to find that the final image lacks impact because the subject blends into a busy background? The human eye is excellent at distinguishing between different elements in a scene, whereas a camera has a tendency to flatten the foreground and background, and this can often ruin an otherwise great photo. Thankfully this problem is usually easy to overcome at the time of shooting – look around for a plain and unobtrusive background and compose your shot so that it doesn’t distract or detract from the subject. Silhouettes can be an incredibly valuable and striking way to do this well.

7. DEPTH

Because photography is a two-dimensional medium, we have to choose our composition carefully to conveys the sense of depth that was present in the actual scene. You can create depth in a photo by including objects in the foreground, middle ground and background. Another useful composition technique is overlapping, where you deliberately partially obscure one object with another. The human eye naturally recognizes these layers and mentally separates them out, creating an image with more depth.

8. FRAMING

The world is full of objects which make perfect natural frames, such as trees, archways and holes. By placing these around the edge of the composition you help to isolate the main subject from the outside world. The result is a more focused image which draws your eye naturally to the main point of interest.

9. CROPPING

Often a photo will lack impact because the main subject is so small it becomes lost among the clutter of its surroundings. By cropping tight around the subject you eliminate the background “noise”, ensuring the subject gets the viewer’s undivided attention.

10. EXPERIMENTATION

Composition in photography is far from a science, and as a result all of the “rules” above should be taken with a grain of salt. If they don’t work in your scene, ignore them; if you find a great composition that contradicts them, then go ahead and shoot it anyway. But they usually prove to be spot on, and are worth at least considering whenever you are out and about with your camera.

— Andrew


Ellen and I hit the road full-time in June of 2016. We are on a mission to inspire and educate everyone on the importance of getting outside. Check out my workshops and my prints, made #ontheroad in my mobile print studio. The revenue will help propel us further on this great adventure. Enrich yourself and others… and feel great about it too as you’re helping to ensure our public lands are cherished and to keep the wild spirit of the American Dream alive. Our goal is to visit all 59 National Parks in 3-5 years. LEARN MORE ABOUT WHAT WE’RE DOING HERE


Check out our new show, ONE WILD LIFE, and subscribe to our YouTube Channel! 


Want to learn photography and enjoy a guided experience? Check out my exciting, NEW workshop dates:
 
REMOTE WYOMING // ADVENTURE + LANDSCAPE
TELLURIDE // FALL COLORS + LANDSCAPE
 
I’m excited to announce my “The Photographic Guide to Our National Parks” series of eBooks:
 
Rocky Mountain National Park
Grand Teton National Park
 
If you are interested in purchasing a “print from the road”, please check my prints for sale, or email me directly for a custom request:
 
Andrew R. Slaton // prints from the road
 
If you are interested in licensing any of the images/ video from this post, please visit my stock agency:
 
Tandem Stills + Motion // Andrew R. Slaton
  
For assignment work requests, please email me: andrew@andrewslatonphoto.com
 
Thanks for visiting AndrewSlatonBlog.com!
 
All images and content © ARS Media, LLC 2018
Standard
beginner, instructional, national parks, photography, travel, workshop

LIGHTROOM // BASIC WORKFLOW

Are you brand new to LightRoom Classic CC? Do you need some tips on how to create a more efficient workflow? Are you overwhelmed by your massive backlog of images?

Whether you are brand new to Adobe LightRoom, or you’re an old pro, my workflow tutorial will give you the basics and more so you can create your own efficient workflow.

Learn how to organize your images, create presets, cull, edit, and process in this 20 minute video.

For a limited time, I will have it on sale for only $9.99!

Click the image below for more info.

— Andrew


Ellen and I hit the road full-time in June of 2016. We are on a mission to inspire and educate everyone on the importance of getting outside. Check out my workshops and my prints, made #ontheroad in my mobile print studio. The revenue will help propel us further on this great adventure. Enrich yourself and others… and feel great about it too as you’re helping to ensure our public lands are cherished and to keep the wild spirit of the American Dream alive. Our goal is to visit all 59 National Parks in 3-5 years. LEARN MORE ABOUT WHAT WE’RE DOING HERE


Check out our new show, ONE WILD LIFE, and subscribe to our YouTube Channel! 


Want to learn photography and enjoy a guided experience? Check out my exciting, NEW workshop dates:
 
REMOTE WYOMING // ADVENTURE + LANDSCAPE
TELLURIDE // FALL COLORS + LANDSCAPE
 
I’m excited to announce my “The Photographic Guide to Our National Parks” series of eBooks:
 
Rocky Mountain National Park
Grand Teton National Park
 
If you are interested in purchasing a “print from the road”, please check my prints for sale, or email me directly for a custom request:
 
Andrew R. Slaton // prints from the road
 
If you are interested in licensing any of the images/ video from this post, please visit my stock agency:
 
Tandem Stills + Motion // Andrew R. Slaton
  
For assignment work requests, please email me: andrew@andrewslatonphoto.com
 
Thanks for visiting AndrewSlatonBlog.com!
 
All images and content © ARS Media, LLC 2018
Standard
advanced, art, beginner, city, equipment review, film, film making, intermediate, landscape, photography, travel, workshop

canon 17-40 f/4L // review

Okay, so I’m going to embark on a journey through territory that is quite new to this blog… reviewing gear.

I’ve been asked by a few folks to give my thoughts on new and old equipment I’m currently working with, so what better opportunity than the recent purchase of a new lens?

I was giddy as a schoolgirl when UPS knocked on my door last week.  It has been a while since I’ve needed to order a new lens.  And I really toiled over this purchse.  Nowadays more than ever before, I wanted to make sure I was really getting the most “bang for my buck”.  I did my research, and I pulled the trigger.  And so the moment of truth; a knock on the door and a shiny new black, white, and red Canon box.

ef17-40


Photo courtesy Canon

The toil I went through was over whether I should purchase the Canon 16-35mm f/2.8L (US $1699) or the 17-40mm f/4L (US $839).  Both are “L series”, Canon’s best glass, and as a professional I generally don’t buy anything less.  As the saying goes, “you’re only as good as the glass you use.”

So I really had a decision to make.

For me, this lens will fill a big gap in my repertoire of focal lengths.  And as more and more of my business is landscape/ cityscape/ architecture, I am in desperate need of a quality super-wide zoom.

Now, just by the nature of super-wides (and zooms for that matter), some sharpness is sacrificed on the edges for the sake of versatility.  If you need tack-sharp, you need a standard prime.  Wide focal lengths will also cause some distortion on the edges… nothing that can’t be easily corrected in post.  Already knowing these drawbacks, I began to research.

Aside from the obvious difference in focal length, the 16-35 is a full stop faster.  But do I need that full stop?  I decided no for the majority of its use.  I would primarily use it as a landscape lens… so shooting outdoors, it’s nearly inconceivable I would need (or want) f/2.8.  And the second most useful application for me is interior architecture.  But again, I typically light the spaces and rarely shoot wider than f/8.  Okay, so is there a sharpness difference between the two?  Well, without having both lenses in front of me to do my own tests, I had to rely on the careful data of others.  I found a fantastic technical analysis of this very comparison on Luminous Landscape.

The information provided by the good people over there really helped me solidify my choice to go with the 17-40.  With no major differences in sharpness, the fact that the filter ring is the popular 77mm (and I have three other 77mm L series lenses, so I was relieved to know that I wouldn’t have to buy all new filters for the newer 82mm on the 16-35), and not to mention the fact that the 17 is half the cost of the 16, I felt good about the choice I made.

Now the moment of truth… would I find a new, helpful tool in the 17, or would I be disappointed with its results?

Well, here’s the very first project I shot with it here in Dallas at White Rock Lake.  And I was VERY happy with the versatility and clarity from my new Canon 17-40mm…

_MG_9445F

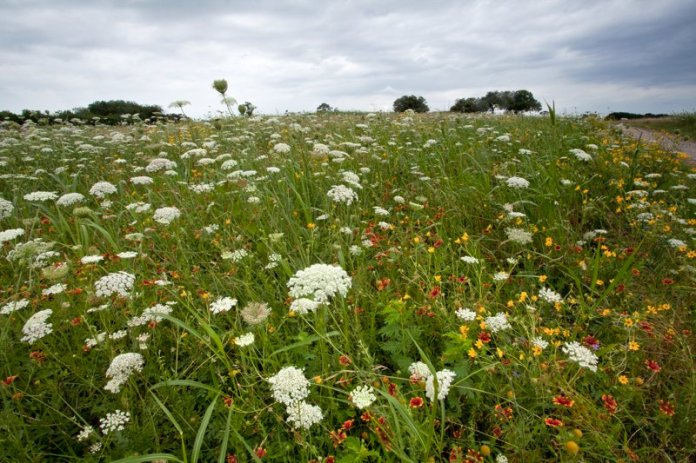
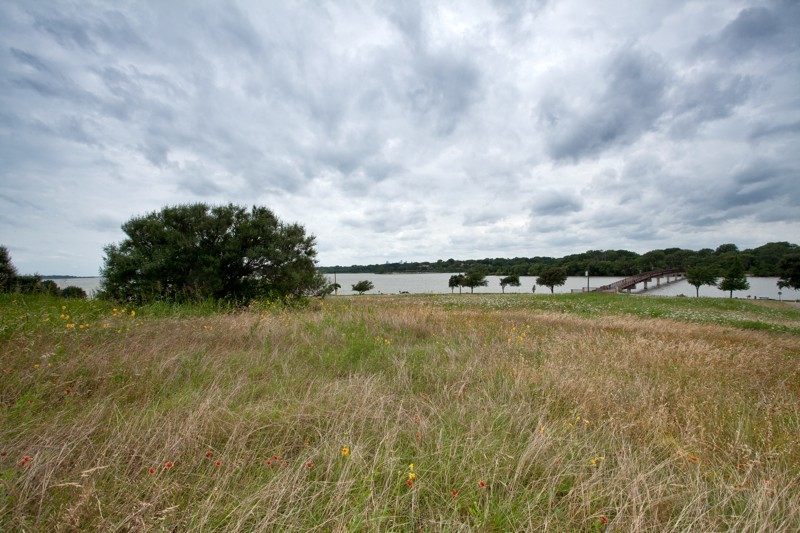
White Rock Lake Wildflowers, Canon 17-40mm f/4L, Canon 5D MKII, 1/60 sec. @ f/22, ISO 400, Singh-Ray 4×6″ Galen Rowell 2 stop Soft-Step Neutral Density filter with Cokin Z-Pro filter holder

_MG_9475F

White Rock Lake Landscape, Canon 17-40mm f/4L, Canon 5D MKII, 1/400 sec. @ f/10, ISO 400, Singh-Ray 4×6″ Galen Rowell 2 stop Soft-Step Neutral Density filter with Cokin Z-Pro filter holder

_MG_9478F

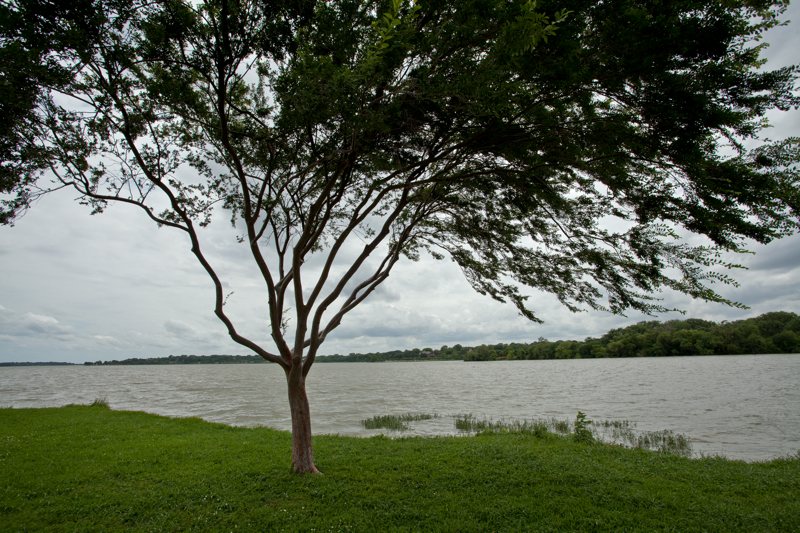
White Rock Lake Lone Tree, Canon 17-40mm f/4L, Canon 5D MKII, 1/640 sec. @ f/10, ISO 400

_MG_1383F

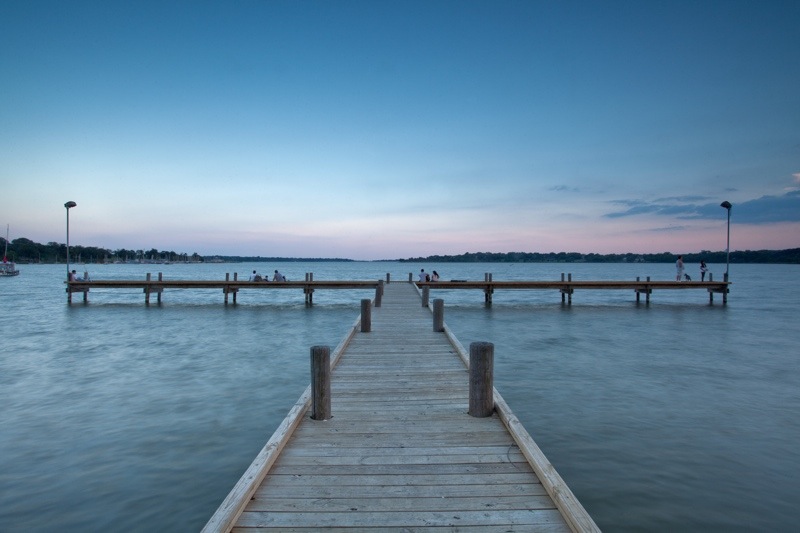
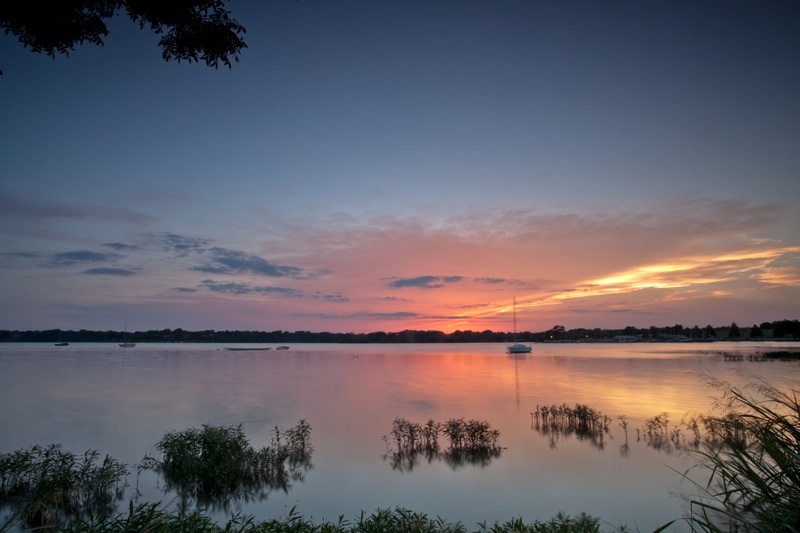
White Rock Lake, Canon 17-40mm f/4L, Canon 5D MKII, 1.6 sec. @ f/22, ISO 50, Circular Polarizer with Singh-Ray 4×6″ Galen Rowell 3 stop Soft-Step Neutral Density filter handheld

_MG_1413F

White Rock Lake Dusk, Canon 17-40mm f/4L, Canon 5D MKII, 1.6 sec. @ f/22, ISO 50, Singh-Ray 4×6″ Galen Rowell 2 & 3 stop Soft-Step Neutral Density filters with Cokin Z-Pro filter holder

_MG_1452F

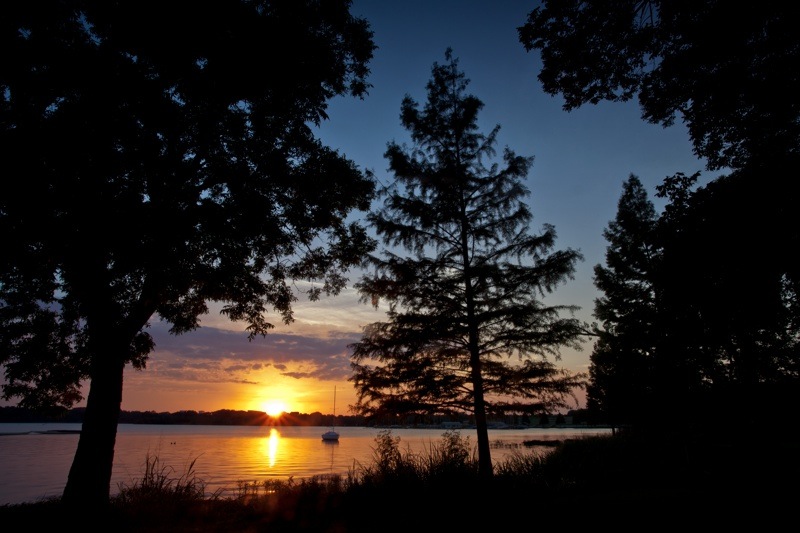
White Rock Lake Sunset, Canon 17-40mm f/4L, Canon 5D MKII, 0.3 sec. @ f/22, ISO 50, Singh-Ray 4×6″ Galen Rowell 2 stop Soft-Step Neutral Density filter with Cokin Z-Pro filter holder

_MG_1755F

White Rock Lake at Dusk, Canon 17-40mm f/4L, Canon 5D MKII, 3.2 sec. @ f/22, ISO 50, Circular Polarizer with Singh-Ray 4×6″ Galen Rowell 2 stop Soft-Step Neutral Density filter handheld

White Rock Lake Sunset Time Lapse, Canon 17-40mm f/4L, Canon 5D MKII, 0.3 sec. @ f/22, ISO 50, Singh-Ray 4×6″ Galen Rowell 2 stop Soft-Step Neutral Density filter with Cokin Z-Pro filter holder

White Rock Lake Time Lapse, Canon 17-40mm f/4L, Canon 5D MKII, 1/25 sec. @ f/22, ISO 50, Singh-Ray 4×6″ Galen Rowell 2 stop Soft-Step Neutral Density filter with Cokin Z-Pro filter holder

Note:  If using the Cokin Z-Pro filter holder, you can expect the edges of the filter to creep into your shot at focal lengths below 20mm.  It’s kind of frustrating.  But it’s not the lens’s fault…

Overall, the Canon 17-40mm f/4L is fantastic.  Like I said, it’s versatile, sharp, fast (enough), light weight, and durable.  I can already see it being an incredibly useful lens in my arsenal.

Please stay tuned… I’ll be reviewing more equipment soon!  And please feel free to share your comments/ questions below!

all content © andrew r. slaton | photographer 2013

Standard